The patchbay is the black canvas that you can see in Bidule. This is where you build the layout/patch to create/manipulate sounds and songs.
Right-click in the patchbay to pop up a menu that contains all available bidules (modules) you can use. The bidules are classified into different categories like Audio Devices, Audio File, Building Blocks, Effects, Groups, Instruments, MIDI, MIDI Devices, Misc, Mixing, Routing and Spectral.

Once the bidule is in the patchbay, you can double-click it to pop up its GUI (only available if the bidule has any parameters)
A bidule has input and output connectors. The little squares on the top of the bidule are the input connectors and the one at the bottom are the output connectors.

Each connector/cable colour specifies a different type of signal. Using the default skin:
- Blue is for audio/data signals
- White is for MIDI signals.
- Yellow (frequency vector) and Orange (amplitude vector): Spectral Processing. These contain not the raw FFT results (complex vector), but actual properly phase vocoded and overlapped signal vectors.
Please note that AU/VST plugins might show up an extra audio output connector. This means that the plugin introduces latency, the extra output will send the introduced delay amount in samples so you can use a Delay Line to have PDC (plugin delay compensation) when you need it.
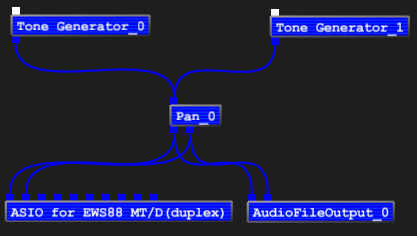
Building a layout is easy. Just choose which bidules you want and connect them graphically, one at the time.

To connect two bidules together, you need to select a connector (it will become bigger when you place the mouse pointer over it), press the left mouse button and then move the mouse to another bidule's connector ( it will also become bigger). Once you have selected the correct one, let go of the left mouse button and a cable linking the two bidules will appear.

To connect multiple connectors from one bidule to another, create the first cable while holding the CTRL(Windows)/Command(OS X) key - Bidule will try to create as many cables as possible.

You can also have multiple cables coming out of one connector or multiple connectors leading into one of the connectors (the signal will be mixed/duplicated automatically).

You can repatch an existing cable by first selecting it (clicking on it when it's highlighted or by lassoing), then by clicking on one of the connectors at the end of the cable and holding the left mouse button until you have selected the new connector.

You can of course send outputs signals back to the inputs signals (provided there is at least another module in between) to create a feedback loop.

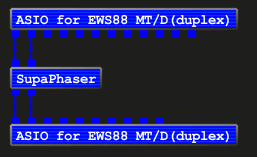
To process live audio (DUPLEX devices only), just connect both bidules representing your duplex device to the processing module (in this example - SmartElectronix's SupaPhaserVST) as shown.

You can insert/remove bidules by holding the ALT key while dragging. Doing this on a connected bidule will remove it and reconnect the before and after bidules the best it cans. You can insert into existing cables by aligning the outputs of the to-be inserted bidule over the cable you wish to insert into.
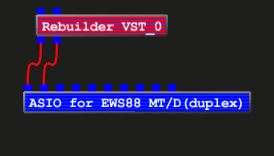
If you ever encounter a red bidule when you load a .bidule file, it means that the saved file contains a reference to a module or plugin that cannot be found within your current configuration. This is usually the case if there is a plugin you didn't own or if you are trying to open a layout that had an Audio or MIDI Device having a bigger index then the number of available devices in your system. The following picture is an example a patch loaded that requires a missing Plogue Rebuilder VST.

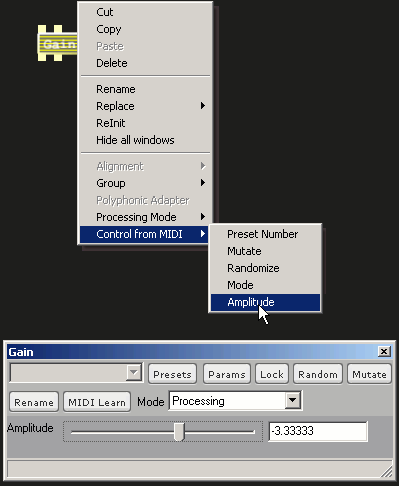
To bring up a Bidule context menu, first left click it to highlight (should turn yellow.. not translucent blue), then hit the right mouse button.
Deletes the selected bidules (and puts them in the undo stack). You can also simply hit the "Del" key, once the bidule is selected.
Brings up an audio signal monitoring window that displays peak meters and sample audio values for each of the input and output channels of the selected bidule. Great to trace issues with clipping or loss of signal in a chain.
Replaces the selected bidules by the one you choose in the menu, connections will be kept if possible.
Replaces the selected bidules by the the first bidule in the pasteboard, connections will be kept if possible.
Allows alignment of selected bidules in the patchbay. The six modes of alignment are:
- Top
- Center Horizontally
- Bottom
- Distribute Horizontally: Spaces selected bidules evenly along the vertical axis
- Left
- Center Vertically
- Right
- Distribute Vertically: Spaces selected bidules evenly along the vertical axis
- Group selected object(s): Selected bidules and cables are grouped together. Internal connections between selected objects are preserved, external connections are lost.
- Save selected group: Save the selected group in a file. If the file is saved in the "groups" subdirectory of bidule's installation directory it will appear in the "Groups" category in the Palette.
- Properties: Allows editing of the number and type of connectors, the author's name, the group version number, and the name of this group.
- Parameters: Allows editing of parameters from child bidules that will be seen as the group parameters.
- Parent group: Display the parent of the visible group (if it is not the top level group). The keyboard shortcut for this feature is BACKSPACE(Windows)/TAB(OS X).
- Expand: Make the selected group the visible group. The shortcut for this feature is CTRL(Windows)/Command(OS X) - DOUBLE CLICK.
Brings up the Polyphonic Adapter dialog if the bidule is suitable for polyphonic uses(it needs to be a group, have at least one MIDI input and at least 2 audio outputs). The polyphonic adapter will treat this group as a synthesizer voice.
Toggles the DSP Adapter on the selected group, currently the DSP Adapter is only used to have a sub-group of bidules run at a buffer size of 1 sample.
Sets the current bidule to run on another thread unit (which usually will also mean another core) than the main one, currently there is a maximum of 7 entries (the main audio thread counts as one so you should see the number of cores on your computer minus one with a maximum of 7). Once a bidule is set to MP Assign, everything connected upwards will ALSO be running on the other thread unit so you should make sure that the layout is not set up so that multiple bidules using MP Assign or not to not all depends on the same upward bidule.
Sets the way the selected bidules are behaving in the patchbay (choices are Process/Mute/Bypass). (this setting is also available on the bidule's GUI). The Use Fades option is to specify if the bidule should be using a fade window (of about 5 ms) on mode changes to prevent clicking, the main reason to disable this option is when you use numbers and not an actual audio signal.

Allows selection of the current bidule internal parameters to be mapped to a MIDI Controller. Only available if a MIDI Device is connected to the current graph.

Mouse:
- Left Mouse Button permits moving bidules, adding connections, etc.
- Right Mouse Button in black patchbay pops up a bidule selection menu.
- Right Mouse Button on a bidule, pops up a contextual menu.
- Double-click on a bidule, pops up its window
Keyboard:
- CTRL-SPACE starts and stops audio
- CTRL(Windows)/Command(OS X)-N starts a new layout
- CTRL(Windows)/Command(OS X)-O opens a saved layout
- CTRL(Windows)/Command(OS X)-S saves the current layout
- Arrow Keys pan through the patchbay.
- CTRL-Up and Down(Windows)/Page Up and Down(OS X)/Mouse Wheel zoom in and out of the patchbay.
- HOME gets back to default pan/zoom settings in the patchbay.
- Backspace(Windows)/TAB(OS X) goes back to the parent group.
- CTRL(Windows)/Command(OS X)-double left click to explore a group.
- CTRL(Windows)/Command(OS X)-A selects everything
- ESC cancels the current selection
- CTRL(Windows)/Command(OS X)-C, V, and X for your usual cut and paste needs.
- CTRL(Windows)/Command(OS X)-D does a copy+paste on a selection
- Highlighting a bidule or connector + "Delete" deletes it. (Backspace too on OS X)
- CTRL(Windows)/Command(OS X)-F to search a bidule by its display name in the current group
- CTRL(Windows)/Command(OS X)-P toggles the display of the Parameters window
- CTRL-M(Windows)/Command-E(OS X) toggles the display of the Mediapool window
- CTRL(Windows)/Command(OS X)-G toggles the display of the Group Manager window
- CTRL(Windows)/Command(OS X)-B toggles the display of the Palette
- CTRL(Windows)/Command(OS X)-1 sets the mode to Process on the selected bidules
- CTRL(Windows)/Command(OS X)-2 sets the mode to Mute on the selected bidules
- CTRL(Windows)/Command(OS X)-3 sets the mode to Bypass on the selected bidules
- CTRL(Windows)/Command(OS X)-9 brings the group properties dialog for the selected or current group
- CTRL(Windows)/Command(OS X)-0 brings the group parameters dialog for the selected or current group
- F2 renames the selected bidule
- ALT-F4(Windows)/Command-Q(OS X) quits Bidule
You can select multiple bidules/connectors by pressing CTRL(Windows)/Command(OS X) while selecting or by using the left mouse button to lasso.